Pre-Flight Checks: Part 3

Summary
During this pre-flight check, we will take everything we've learned thus far, make final simulator preparations, then connect our simulators to the VATSIM network.
Training Material
Prior to spawning an aircraft into the simulator and connecting to VATSIM, we want to be sure a few final preparation items are complete.
- All simulator multiplayer traffic (that is not connected to VATSIM) as well as AI/live air traffic should be shut off.
- Any default or other third party add-on ATC functionality should be turned off.
- All simulated failures should be disabled.
- Use real-world weather and time-of-day settings.
A note on simulated failures: Simulated failures/emergencies are permitted on the VATSIM network, but only while under ATC coverage, and to the extent they do not negatively impact other VATSIM members. Air traffic controllers have the discretion to either accept/simulate the emergency or advise you that the emergency is not able to be accommodated. If ATC is not able to accommodate your failure, you will be asked to either resume a normal operation or disconnect from the network. BVA recommends that pilots generally do not simulate failures on the VATSIM network. You will receive more information regarding simulating failures correctly, during WINGS IFR 22.
Regarding weather settings: ATC will provide services based on the current, real-world weather and time-of-day. The VATSIM Code of Conduct requires all pilots to simulate at least the real-world winds, temperature, and pressure throughout all phases of flight. So long as pilots comply with this requirement, they may connect using other preset time and weather conditions. If a pilot chooses to do so, they should advise ATC upon initial contact if the change in weather or time-of-day will be relevant to their operation (e.g., a real-world airport is IMC (instrument conditions) but you've chosen to fly VFR and set clear skies weather).
Once complete, select your desired aircraft, livery, and weight and balance settings as you would for any other flight. Always start with an aircraft you are familiar with and know how to control.
Then, select your desired starting or "spawn" location. You can start at any airport, but ensure you do not connect while on a runway. If you are flying an airliner, it's common to choose a "Gate" from the list of parking spots. If you are flying a general aviation aircraft, pick a spot that says "Parking".
Connecting to VATSIM
When your aircraft is loaded into a parking spot, you are ready to connect to the network.
For this section, we'll provide instructions for the use of the vPilot client. Pilots using xPilot or swift can follow these instructions but will see different user interface options.
Open your pilot client, and click the "Connect" button:

In the "Connect" dialog, enter information about your aircraft.
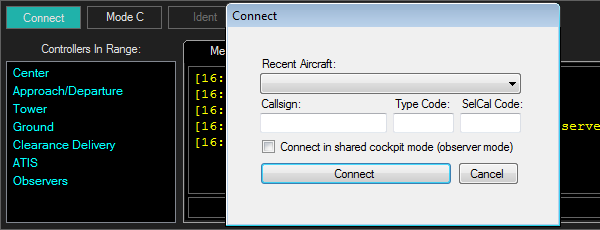
The way you enter this information is critical to ensuring other pilots see you as you want to be seen. You are required to enter a Callsign and Type Code. The SelCal Code is optional and is typically only used during events like Cross the Pond.
We'll now look in more detail at the 'Callsign' and 'Type Code' sections of the connection dialog box.
Callsign
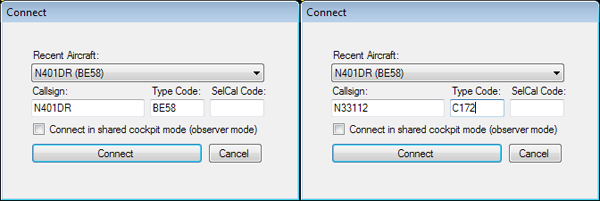
If you plan to fly a General Aviation airplane (non-commercial), your aircraft is likely to use the registration number as the call sign. Alternatively, airline callsigns consist of a three letter prefix assigned to the airline, followed by the flight number.
General Aviation Callsigns
Non-commercial aircraft often use their civil registration to interact with ATC.
In the United States, civil registrations (also called "N-number" or "tail number") begin with the letter "N", followed by:
- Anywhere from one to five numbers (e.g., N24896, N5333, N243, N12, N2).
- Anywhere from one to four numbers, followed by a letter (e.g., N2385P, N829P, N12A, N2A).
- Anywhere from one to three numbers followed by two letters (e.g., N107KR, N70AF, N2AG).
Note that the letters "I" (India) and "O" (Oscar) are not used in these tail numbers to avoid confusion with the numbers 1 (one) and 0 (zero), and the numeric portion of these callsigns cannot begin with zero (for example, N032BC is incorrect).
Registrations for aircraft in other countries are quite different. They normally consist of five letters. For example, an aircraft registered in Canada might have registration like "C-GYAP". While the "dash" in the tail number is written on the fuselage for readability, it is not included in air traffic systems. When filing a flight plan or choosing a callsign, the "dash" is omitted, and the tail number should be submitted as CGYAP instead of C-GYAP.
There are also specific 'formulas' for aircraft registrations from other countries. Some of these include LQ-xxx (Argentina), XB-xxx (Mexico) and HB-Vxx (Switzerland) - in all cases, the final three 'x' digits are to be replaced with numbers.
Here are a few examples of how to connect using GA callsigns:
Airline Callsigns
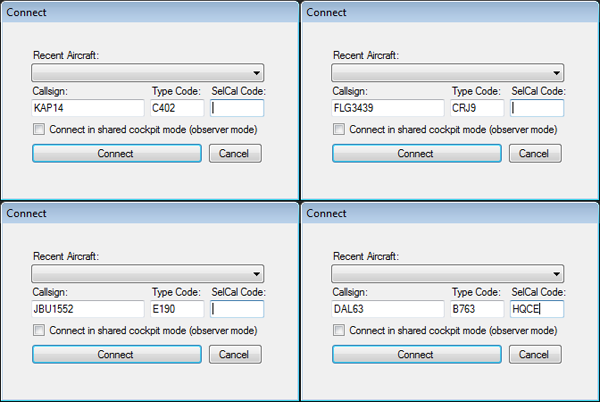
Airline callsigns consist of a three letter prefix assigned to the airline and are normally followed by one to four numbers representing the flight number. Again, dashes are not used in the callsign (e.g., use AAL603 instead of AAL-603). A list of common callsigns can be found on the Airline Codes page of our website.
Here are a few examples of how to connect using airline callsigns:
Type Code
The Type Code tells other pilots the aircraft you are flying. Each aircraft has a type code, which is normally three or four characters. A list of common type codes is available on the Type Abbreviations page of our website. Correct Type Codes also appear as you begin to enter your aircraft's information. Do not enter a prefix (e.g., "H/") or equipment suffix; those come later when you are filing a flight plan.
When you are ready to go online, click "Connect":
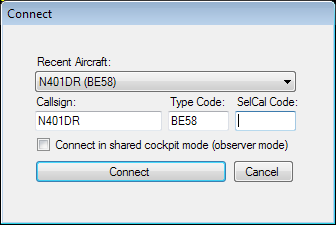
Your pilot client will connect to the network, show you a list of controllers signed in, and begin to display other members' aircraft in your simulator.
Filing a Flight Plan
Just like in real life, you are only required to file a flight plan when operating IFR. VFR flight plans are optional. Within the United States, VFR flight plans are not transmitted or available to air traffic control.
When filing an IFR flight plan, there are a few options to make the process as easy as possible:
- Use SimBrief, a free tool for virtual pilots.
- File your flight plan manually on the VATSIM website.
Using SimBrief
SimBrief is a free flight planning tool available for virtual pilots. The website helps find routes and generates an Operational Flight Plan (OFP), a nav log with performance calculations to help with fuel and navigation. Alongside helping you plan how much fuel to bring, the OFP also generates an IFR flight plan that can be imported to the VATSIM network. Once your SimBrief OFP has been generated, scroll to the bottom of the page and select "Show Details" next to "Prefile on a Network", then select the "Prefile" button next to VATSIM.

Filing a Flight Plan Manually
To manually file a flight plan, visit this page. Any flight plan you file through this system will automatically be registered when you connect to the network using a matching callsign.
The flight plan form has several fillable fields, with required fields denoted by an asterisk (*). A brief description for each of the fields is included in the sections below:
| Block | Details |
| Callsign |
The callsign you will connect to the network with. (For more information on using correct callsigns, visit our Airline Codes page.) |
| Flight Rules | The flight plan allows you to file IFR or VFR. Other types of flight plans (composite, DVFR, SVFR) are not supported. Special VFR is available from ATC upon pilot request. It is important to note that when filing a VFR flight plan within U.S. airspace, although the plan's information may be stored on the network, it is not readily available to ATC - this mimics real-world FAA systems. |
| Aircraft Type | The approved (ICAO) Aircraft Type Designator for your aircraft. This will typically be between 2-4 characters, and most commonly exactly 4 characters. To look up your aircraft type, visit our Aircraft Type Abbreviations page. Be sure this matches the aircraft type code you connect to the network with (see above). |
| Wake Category | The ICAO Wake Turbulence Category for your aircraft, based on the maximum certificated takeoff weight of the aircraft. You can find this information by using the search on our Aircraft Type Abbreviations page. |
|
Equipment |
List the equipment capabilities of your aircraft, including all operable equipment, even if you do not plan to use a particular capability on this flight. Equipment capabilities are indicated with letters that correspond to a specific capability. For example, including the letter "D" means your aircraft has DME. As this information is not transmitted to U.S. ATC on VATSIM, the exact information you include is currently not all that important. Some common equipment entries are provided below. The full list of equipment options may be found in FAA AIM Table 5-1-4.
|
| Transponder |
Enter one of the following characters (note: despite what you file, VATSIM currently only has the ability to simulate Mode C transponders):
|
| Departure | The ICAO code of the departure airport. |
| Off Block UTC (HHMM) | The proposed time for you to remove the parking brake and begin to push or taxi, in Zulu (GMT). |
| Altitude |
The planned altitude for the flight, in feet. IFR flights are always flown at altitudes on the thousands.
VFR flights follow the same rules as IFR flights, but add 500' to each altitude. Remember, VFR flight is prohibited in Class A airspace (above 17,999').
|
| Airspeed | The planned true airspeed at cruise (in knots). |
| Arrival | The ICAO code of the arrival airport. |
| Alternate | If operating IFR, the ICAO code of an airport you might divert to in the event bad weather is encountered at the destination (not required for VFR). |
| Enroute Time (HHMM) | The planned time for your flight, in hours and minutes. |
| Fuel Endurance (HHMM) | The amount of time your aircraft will be able to fly at its "endurance" profile, based on the amount of fuel boarded at departure. |
| Route Details |
Enter the proposed route of flight, including any proposed SIDs or STARs (if operating IFR). VFR routes can be as simple as "Highway 25". If you are flying IFR and are unsure of which route to file, BVA maintains a set of Preferred Routes for common citypairs in our airspace. |
| Other Details |
This section populates the "Remarks" section of the flight plan (for example: "DOF/210106". Below, we only list the fields that would be relevant/helpful for VATSIM flight plan filing purposes. When a section is not listed below, we recommend leaving it blank. For more information on sections not listed below, reference FAA AIM 5-1-9 and other real-world sources.
|
Once you have completed the flight plan, click "File Plan (FPL)". You are now ready to fly!
Who Do I Talk To?
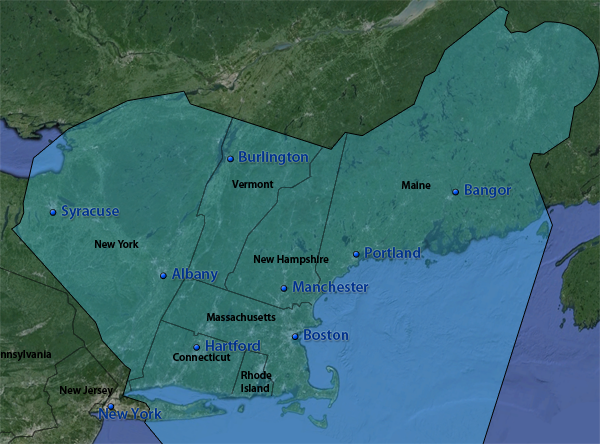
Controllers at Boston Virtual ARTCC provide ATC within the Boston ARTCC (ZBW). The airspace covers 165,000 square miles of airspace in Connecticut, Vermont, Massachusetts, Rhode Island, Maine, New Hampshire, and parts of New York State:
Active controllers will appear in your pilot client and also on network monitoring tools like VATSIM Radar and VATSpy.
The position the controller is working is identified by the following abbreviations:
- DEL = Clearance Delivery
- GND = Ground Control
- TWR = Local Control (Tower)
- APP = Approach
- DEP = Departure
- CTR = Center
Certified controllers always log in to the highest position they wish to control and cover all positions "underneath" that aren’t already staffed. For example, if you see a Boston Approach controller online (e.g., BOS_APP on 133.00), the controller handles approach, and will also cover Boston Tower, Ground, and Clearance, if another controller is not logged on to any of those positions.
If you are ever unsure of which controller to contact, call the controller you think will provide coverage via voice, provide your location, and ask for the correct frequency. The controller will be happy to point you to the right place. Because ATC audio is range-based, if you don't get a response from one controller, you may have to try contacting someone else.
At all times, when there are no controllers online, monitor UNICOM on 122.80, and treat the network as you would for a VFR flight in uncontrolled airspace, making appropriate position reports via text or voice and keeping an eye out for other traffic.
If a controller is logged in as Tower or Ground with no Approach or Center frequency active, that controller will not handle the duties of Approach (i.e., that controller will not provide radar vectors to IFR airrcraft). In this scenario, inbound IFR aircraft should monitor UNICOM on 122.80 until they turn final, and then contact Tower for a landing clearance. Likewise, the departure frequency for all departing aircraft in this situation is also UNICOM. If you’re not flying in an active controller’s airspace, monitor UNICOM to communicate with other pilots and announce intentions.
Radar controllers (working Approach, Departure, or Center) will control "top down" at any towered (Class B, C, or D) airport within their underlying airspace. That means BOS_APP would provide tower services (clearance, taxi, takeoff, etc.) at KBVY, KLWM, KOWD, and KBED, all of which are located within the lateral boundaries of BOS_APP. Thus, a departure from KLWM would also contact BOS_APP for clearance, taxi, and takeoff when LWM_TWR is offline, just as a departure from KBOS would contact BOS_APP for clearance, taxi, and takeoff when BOS_TWR is offline.
One way to determine which "Approach" or "Center" airspace the airport is located in is to look at the airport's communication information by searching for the airport code on AirNav:
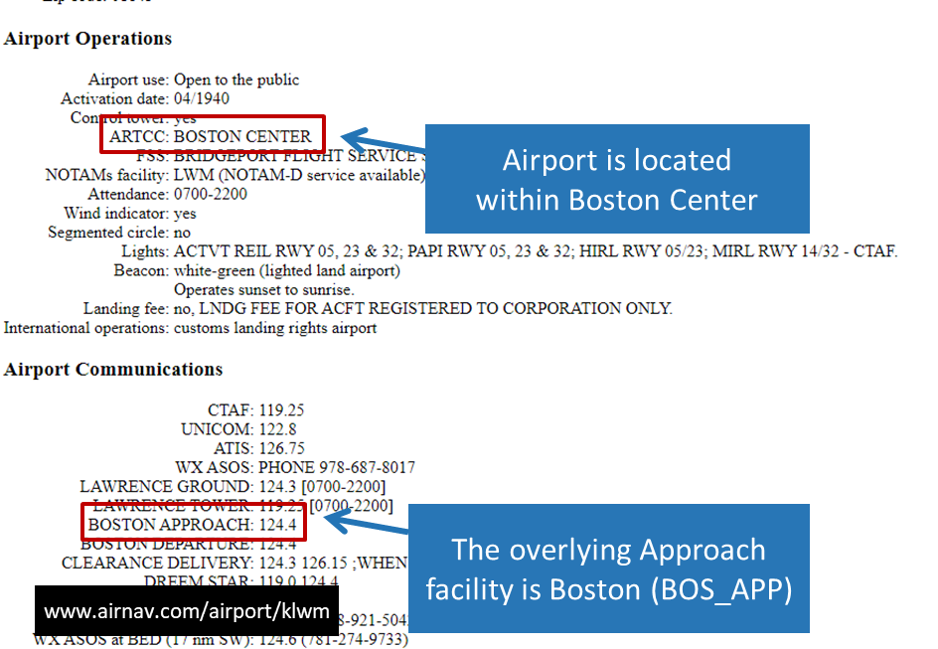
In the above image, the airport is located within Boston Center and is also covered by Boston Approach. Assuming there is no Tower or Ground online at the airport, the pilot would contact BOS_APP (if online) or BOS_CTR. If neither of those positions are staffed, UNICOM would be used.
To further clarify which controller is the right one to speak with, consider the following list of active controllers:
- BDL_GND (on 121.90)
- BDL_TWR (on 120.30)
- BOS_APP (on 133.00)
In this example scenario:
- Flying IFR from KBOS to KBDL, an aircraft would contact 133.00 (Boston Approach/Departure) for clearance, taxi, takeoff, and departure instructions. The aircraft would then be switched to UNICOM for the remainder of the flight. The aircraft would receive no IFR vectors from BDL_TWR but instead should contact 120.30 after lining up on final approach. In this scenario, it is imperative pilots check the ATIS to determine which runway is active.
- Flying IFR from KBDL to KBOS, an aircraft would contact 121.90 (Bradley Ground) for clearance and taxi. The aircraft could expect a takeoff clearance but no further instruction until approaching Boston when BOS_APP would provide vectors for landing.
- Flying VFR into KBDL, an aircraft should contact BDL_TWR 20 miles from the airport to receive sequencing instructions. Because this aircraft is VFR, no vectoring will be provided.
- Flying IFR from KOWD to KBDL, an aircraft would contact 133.00 (Boston Approach/Departure) for clearance, taxi, takeoff, and departure instructions at KOWD. Because no controllers are online at KOWD, BOS_APP covers those positions and aircraft should contact that facility accordingly. The controller would be referred to as "Boston Departure" on the radio.
Please remember that when you leave our ZBW home airspace, you are no longer flying with BVA controllers. While members are encouraged to explore the world of VATSIM, it's important to remember that you are only talking to BVA controllers when you are flying within the Boston (ZBW) ARTCC.
Listening In
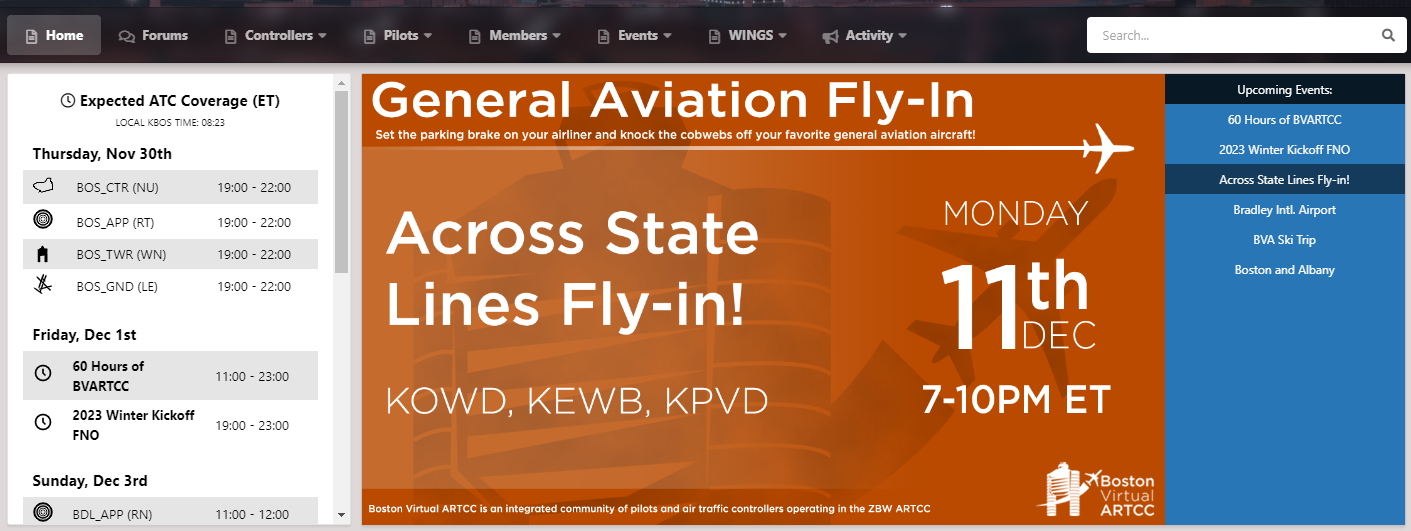
Once you've made it this far, you're ready to start flying. However, keep in mind that there is nothing requiring you to jump straight into a flight. While it's understandable to be eager, many new pilots have found that gaining confidence by simply listening in to ATC has proven valuable prior to embarking on their first flights. While listening in, take the time to review BVAs Pilot References. Remember, if you're trying to find a time when Boston controllers will be online to listen to, check out the Expected ATC Coverage tab on our homepage.
Obtaining Credit
This section applies to BVA members who wish to receive credit for completion of this pre-flight. If you're not a BVA member, you can join today for free to get access to 30+ WINGS training flights, our Discord, TeamSpeak, and more.
To obtain credit for this WINGS Pre-Flight, BVA members can connect to the VATSIM network and communicate over voice with ATC to ensure all settings are configured properly. This will function as a final technical check before you get started on the actual WINGS training flights.
You'll need to do this while ATC is online within ZBW airspace. You can connect to any airport where coverage is available, but it's best to find a smaller airport where either GND or TWR are staffed, if possible. Doing so will decrease frequency congestion for higher level controllers, such as Boston Center.
Connect to VATSIM, then tune to a BVA controller's radio frequency and verbally request credit for WINGS Pre-Flight Part 3:
- N123AB: "Bradley Ground, N123AB."
- BDL_GND: "N123AB, Bradley Ground."
- N123AB: "Bradley Ground, N123AB, requesting credit for WINGS Pre-Flight Part 3."
If you did not connect to the network using your full name (i.e., you used a VATSIM CID or a variation of your name), please also send the controller a direct message with your full name.
It should be noted that requesting a radio check at the start of each flight is not necessary, and is discouraged due to ATC workload. If your call to taxi or for IFR clearance will be to ATC anyway, there's no need to check your radio separately. Pilots should only request a radio check when necessary (i.e. when you suspect you may be having technical difficulties, or have poor reception). If you find yourself having technical difficulties, refrain from asking the controller for assistance due to workload. Instead, request assistance from a VATSIM Supervisor, as covered above, or ask for help in our community Discord.
Taking the Next Steps
Now that you've completed our three-part "Pre-Flight Checklist", you're ready to start flying on the network. If you'd like to continue on the learning journey of becoming a more proficient pilot within the virtual ATC system, feel free to continue on our main WINGS series, which covers everything from VFR closed traffic through to complex IFR flying. Learn more about the free Wings Over New England training program here - available to BVA members only.
Should you experience any issues while connected to the VATSIM network, VATSIM Supervisors are there to help! VATSIM Supervisors are volunteers who use their experience and knowledge to help VATSIM users enjoy the network by answering questions and providing limited technical support. Where necessary, they are also empowered with enforcing the VATSIM Code of Conduct and other policies. When needed, members connected to VATSIM may request the assistance of a VATSIM Supervisor by typing ".wallop" in the pilot client text box, followed by a brief description of the issue.
Example: ".wallop I am having issues filing a flight plan."
At the completion of this pre-flight checklist, you will:
- Connect to the VATSIM network.
- Learn about VATSIM ATC's top-down structure.
- File a flight plan on VATSIM.
