
BVA's Getting Started Guide: Sharing Aircraft
Sharing Aircraft >> Overview | Hosting a Shared Aircraft | Joining a Hosted Aircraft | Tips and Tricks
To host a shared aircraft, you must first configure your router to alllow other members to connect to your computer through FSX. Next, you set up an FSX multiplayer session. Once the other pilot has connected, you can use vPilot to connect to the VATSIM network in the usual fashion.
Configuring the Connection
To set up an FSX multiplayer session, you will need to configure your router to send packets related to FSX to the comptuer running FSX. In order to do so, you need to forward the ports below on your home internet router.
First, determine the "private" IP address of the computer you are running FSX on. Open Command Prompt (Start > All Programs > Accessories > Command Prompt). A box will appear. Type "ipconfig" and then press "Enter". Underneath the active connection, note the IPv4 Address:
In this example, the private IP address of the FSX computer is 192.168.1.159. Note that, in some cases, this IP address can change (say, when you restart your router). If you find that hosting stops working, there is a good chance that a change to this IP address could be the reason.
Next, connect to your home router by typing in the Default Gateway address into a web browser. In the example above, the user would type "192.168.1.1" into the web browser. Check your router, or its associated instructions, for more information on accessing port forwarding.
Once logged into your router's administration panel, find the "port forwarding" menu selection. Next, you will have to make multiple entries to "forward" a port or a port range, using the list below, to the private IP address found above. For each port, be sure you indicate "TCP" or "UDP" or "both (depending on your router, you may need to specify two entries using both UDP and TCP).
Here is an example for the first port, 23456:

23456...................UDP
63210...................TCP
6667.....................TCP
3783.....................TCP
27900...................TCP
28900...................TCP
29900-29901.........TCP
13139...................Both
6515.....................Both
6500.....................TCP
2300-2400.............UDP
6073.....................UDP
6112-6122.............UDP
Check the specific port forwarding instructions for your router, or post on the forums, if you need help forwarding ports. Almost all shared session hosts will have to set up port forwarding in order to be able to have other users connect to their session.
Hosting an FSX Multiplayer Session
Once the ports are forwarded, the rest of the setup happens within FSX.
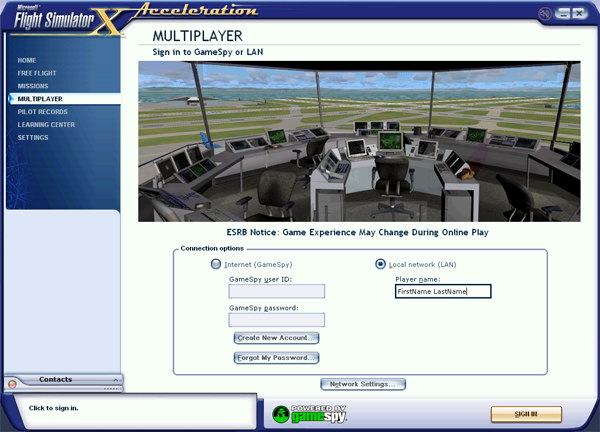
With FSX open, click on the "Multiplayer" tab.
Under the Local network (LAN) option, Enter your choice of username (most people choose their first and last names). The default value in the box will be "Player", so make sure to change it. Then, click "Sign In".
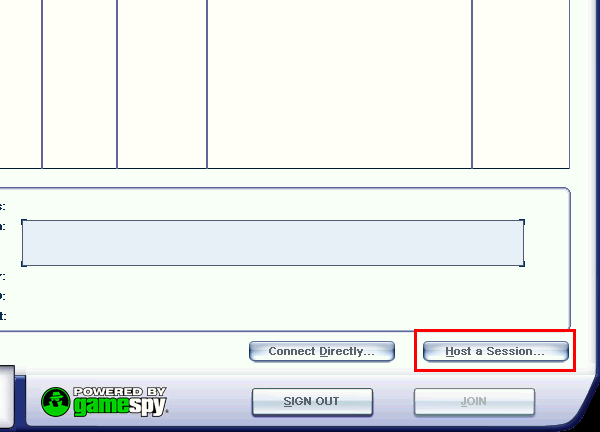
Click the "Host a Session..." button near the bottom of the screen:
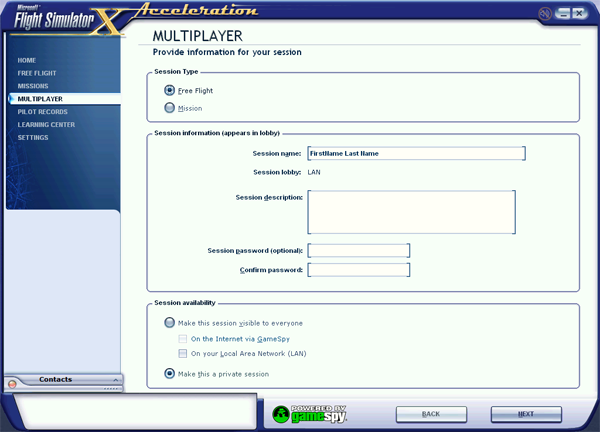
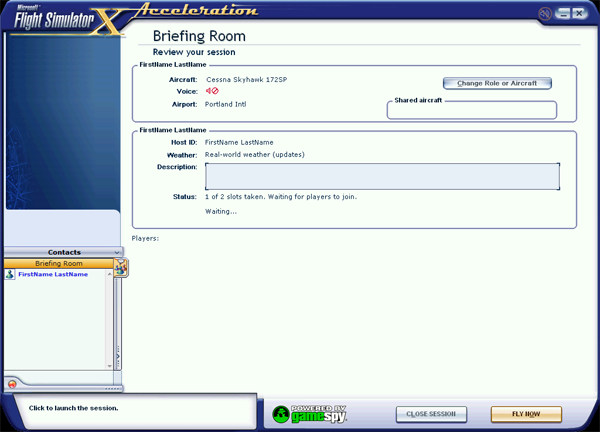
Enter the desired session information, including a name. Select the "Make this a private session" option.
Next, select the aircraft you wish to fly. As usual, the "ATC Name" (or selected callsign) does not matter. You can also choose the time and weather for the session. Unless your co-pilot is running a weather add-on like ActiveSky, the weather settings you select will be the same for everyone else who is flying with you.

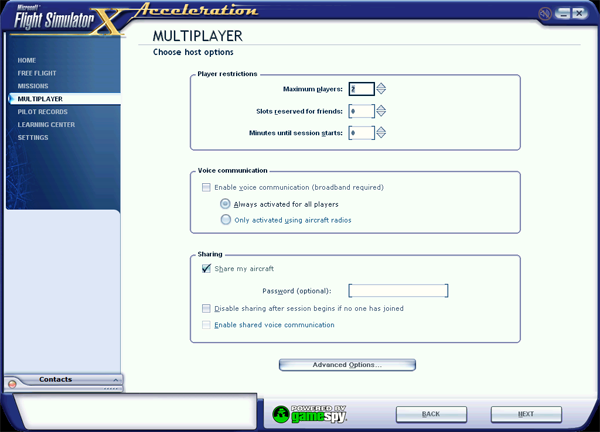
Once the aircraft and session conditions are selected, click "Next", then choose host options. We recommend the settings below. In order not to hear an echo when you both talk, ensure the "Enable voice communication (broadband required)" checkbox is not selected. The "Share my aircraft" checkbox should be selected.
Finally, click "Fly Now" to begin the session and spawn your aircraft.
From this point, a co-pilot can join your aircraft. The co-pilot will need to connect to your session by using your public IP address. This is different from the IP addresses you found above, and will not begin with "192.168...". To find your public IP address, use the website http://whatismyipaddress.com.
A message will be depicted at the top of the FSX screen when your co-pilot joins the aircraft.
Connecting to VATSIM
Once you are both spawned into the FSX multiplayer session, it's time to connect to VATSIM. To do so, open vPilot, and connect as you would for any other flight. There are no special requirements when connecting to VATSIM as the host of a shared aircraft.
Once both pilots are connected, either pilot will be able to transmit and receive on vPilot, but only one pilot will be able to have control of the aircraft at a time. By default, the host has control. To request control from the host, or to accept control from the host, use the key command "SHIFT + T". It is also good practice to for each pilot to state "You have control" / "I have control" (as appropriate) during any transfer.
| What would you like to do? |
| Host a Shared Aircraft |
| Join a Hosted Aircraft |
| View Tips and Tricks for Sharing Aircraft |